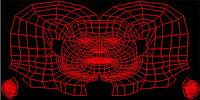
 The texture map is first loaded into photoshop, and assigned as the background image . A new layer called 'Guide' is then added with a bright colour that stands out so it can be distinguished easily from any texture painting.
The background wireframe image is then pasted onto the guide layer via the 'quick mask' mode, which will only display the wireframe.

Texture painting is done by simply selecting areas on the reference image using the 'lasso' tool and pasting them onto the wireframe image (on a new layer of course!).
This process is repeated until large sections of the face have been added. At this point, there are alot of open gaps between the different sections which need to be filled in. I did this by using the 'patch' and 'clone stamp' tools to drag smaller sections of the images in to fill any gaps and blend the skin layers.
This process is repeated until large sections of the face have been added. At this point, there are alot of open gaps between the different sections which need to be filled in. I did this by using the
 'patch' and 'clone stamp' tools to drag smaller sections of the images in to fill any gaps and blend the skin layers.
The texture needs to be applied to the model in 3ds max, in order to see how the texture is being applied, and to find any problems. Using the material editor, the photoshop file is imported and applied to the model. The screenshots below show different stages of the texture mapping development..


The finished texture map..

Note - I have mirrored the image across to the other side, this saves time and allows the texture map to cover the entire model.
No comments:
Post a Comment